Google App Engine には Spring Boot で作った Web サービスを公開できます。
無料枠も結構あることから、個人が趣味で開発したアプリなどデプロイするのに適しています。
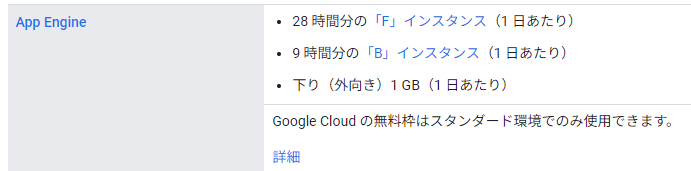
ちなみに2023年8月11日現在の無料枠です。
Google Cloud の無料プログラム
今回は最もシンプルな Web アプリケーションを App Engine 上で公開する方法をご紹介します。
Java と Maven はインストール済みの前提です。
あと、Google Cloud のアカウントはあらかじめ作成して、プロジェクトを作っておいてください。
Google Cloud CLI もインストールしておいてください。
App Engine のアプリケーションを作成する
プロジェクト内に App Engine のアプリケーションを作成します。
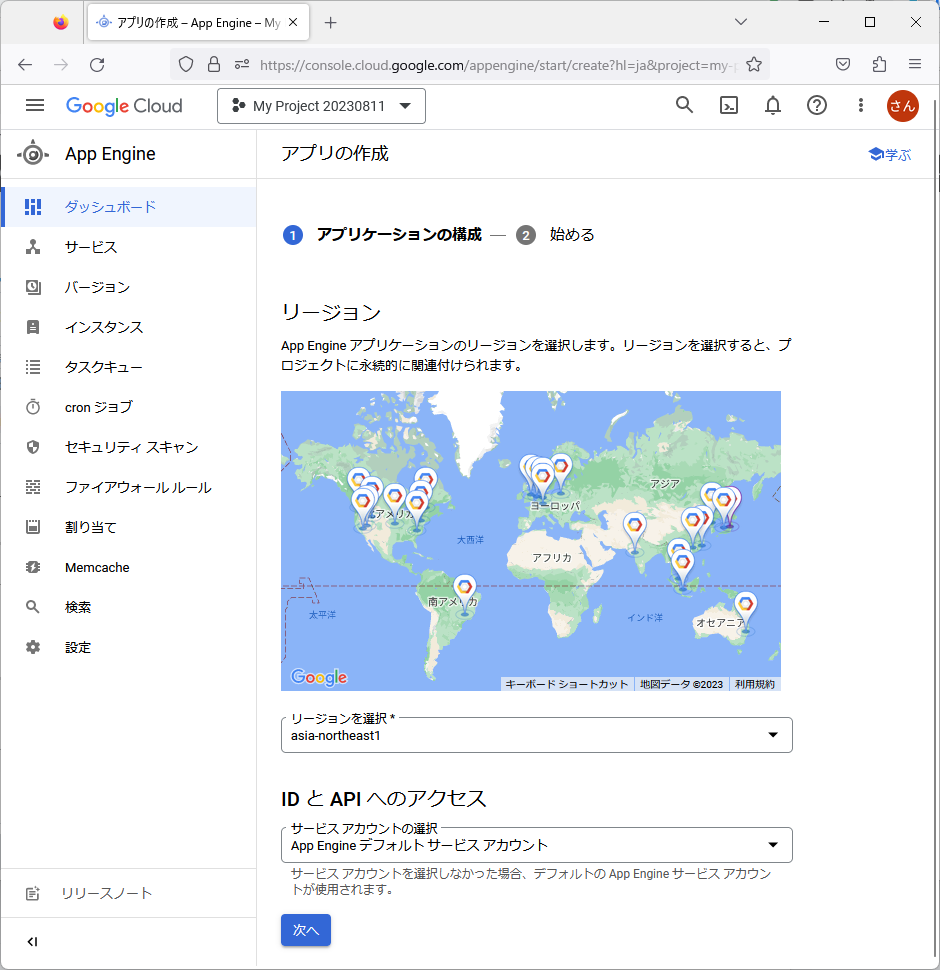
Google Cloud コンソールのメニューから App Engine を選択します。

次の画面が表示されるので「アプリケーションを作成」をクリック。

リージョンとサービスアカウントを選択します。今回は以下のように選択しました。
次に言語と環境を聞かれるので次のようにしましたが、これは 「GitHub で各言語のサンプルを見よ」と言っているだけのようです。この画面が表示された時点で既に App Engine の作成は完了しているようです。

App Engine のダッシュボードを見ると、無事に作成されているようです。

Spring Boot Initializr でソースの雛形を作成する。
https://start.spring.io/ にアクセスします。
次のような感じで入力しました。
・Maven プロジェクト
・言語:Java
・Spring Boot のバージョン: 2.7.14 (バージョン 3 系は Java 17 が必要)
・グループ:org.yyama
・アーティファクト:gae-spring-boot-sample
・アプリ名:gae-spring-boot-sample
・Java パッケージ:org.yyama.gae-spring-boot-sample
・パッケージング:jar
・Java バージョン:11

「GENERATE」ボタンをクリックすると ZIP ファイルがダウンロードできます。
適当にプロジェクト用のフォルダを作成して、そこに解凍します。
私の場合「D:\yyama」フォルダ以下に解凍して次のようなファイル・フォルダ構成になりました。

ソースの追加と修正
ソースの修正
今の状態だとリクエスト URL を受け取るコントローラが記述されていません。
「GaeSpringBootSampleApplication.java」を修正します。
修正前:
package org.yyama.gaespringbootsample;

import org.springframework.boot.SpringApplication;
import org.springframework.boot.autoconfigure.SpringBootApplication;

@SpringBootApplication
public class GaeSpringBootSampleApplication {

	public static void main(String[] args) {
		SpringApplication.run(GaeSpringBootSampleApplication.class, args);
	}

}
修正後:
package org.yyama.gaespringbootsample;

import org.springframework.boot.SpringApplication;
import org.springframework.boot.autoconfigure.SpringBootApplication;
import org.springframework.web.bind.annotation.GetMapping;
import org.springframework.web.bind.annotation.RestController;

@SpringBootApplication
@RestController
public class GaeSpringBootSampleApplication {

	public static void main(String[] args) {
		SpringApplication.run(GaeSpringBootSampleApplication.class, args);
	}

	@GetMapping("/")
	public String hello() {
		return "Hello world!";
	}

}
設定ファイルの追加
「~\gae-spring-boot-sample\src\main\appengine」フォルダを作成し、その下に「app.yaml」を作ります。
ファイルの内容は以下のようにします。
runtime: java11
このファイルには App Engine のランタイム環境に関する設定を記述します。
公式リファレンスのURLを貼っておきます。
App Engine app.yaml リファレンス | Google App Engine スタンダード環境のドキュメント | Google Cloud
ローカルでお試し実行
コマンドプロンプトを起動し、アプリの位置まで cd コマンドで移動します。私の場合は「D:\yyama\gae-spring-boot-sample」です。
そこで「mvn spring-boot:run」を実行します。
次のようなメッセージが出ます。Tomcat を起動しているようですね。

ブラウザで「http://localhost:8080」にアクセスして「Hello world!」が表示されれば成功です。

動作確認が完了したらコマンドプロンプトで Ctrl + c を押して Tomcat を終了させます。
App Engine にデプロイ
ローカルでお試し実行したときのコマンドプロンプトでまず「gcloud init」で SDK の初期化を行います。
プロジェクトの ID 等を聞かれますので適切に答えます。私の回答例です。
D:\yyama\gae-spring-boot-sample>gcloud init
Welcome! This command will take you through the configuration of gcloud.

Settings from your current configuration [default] are:
accessibility:
  screen_reader: 'true'
core:
  account: xxxxxxxxxx@gmail.com
  disable_usage_reporting: 'False'
  project: my-project-20230811

Pick configuration to use:
 [1] Re-initialize this configuration [default] with new settings
 [2] Create a new configuration
Please enter your numeric choice:  1

Your current configuration has been set to: [default]

You can skip diagnostics next time by using the following flag:
  gcloud init --skip-diagnostics

Network diagnostic detects and fixes local network connection issues.
Checking network connection...done.
Reachability Check passed.
Network diagnostic passed (1/1 checks passed).

Choose the account you would like to use to perform operations for this configuration:
 [1] xxxxxxxxxx@gmail.com
 [2] Log in with a new account
Please enter your numeric choice:  1

You are logged in as: [xxxxxxxxxx@gmail.com].

Pick cloud project to use:
 [1] my-project-20230811
 [2] Enter a project ID
 [3] Create a new project
Please enter numeric choice or text value (must exactly match list item):  1

Your current project has been set to: [my-project-20230811].

Not setting default zone/region (this feature makes it easier to use
[gcloud compute] by setting an appropriate default value for the
--zone and --region flag).
See https://cloud.google.com/compute/docs/gcloud-compute section on how to set
default compute region and zone manually. If you would like [gcloud init] to be
able to do this for you the next time you run it, make sure the
Compute Engine API is enabled for your project on the
https://console.developers.google.com/apis page.

Your Google Cloud SDK is configured and ready to use!

* Commands that require authentication will use xxxxxxxxxx@gmail.com by default
* Commands will reference project `my-project-20230811` by default
Run `gcloud help config` to learn how to change individual settings

This gcloud configuration is called [default]. You can create additional configurations if you work with multiple accounts and/or projects.
Run `gcloud topic configurations` to learn more.

Some things to try next:

* Run `gcloud --help` to see the Cloud Platform services you can interact with. And run `gcloud help COMMAND` to get help on any gcloud command.
* Run `gcloud topic --help` to learn about advanced features of the SDK like arg files and output formatting
* Run `gcloud cheat-sheet` to see a roster of go-to `gcloud` commands.
SDK の初期化が終わったら「gcloud app deploy」を実行します。
成功したときの出力例です。

デプロイ時のログにも出力されている URL 「https://my-project-20230811.an.r.appspot.com」にアクセスしてみると、次のように出力されました。

これでこのシンプルな Web アプリケーションが全世界に公開されました。
まとめ
この記事では、Google App Engine を使用して Spring Boot で作成した Web サービスを公開する手順について紹介しました。Google App Engine は無料枠が充実しており、個人開発のアプリケーションをデプロイするのに適しています。
是非この方法を活用して、自身のアプリケーションを公開し、多くの人にアクセスしてもらいましょう。
それでは!!!
![Google App Engine for Java[実践]クラウドシステム構築 WEB+DB PRESS plus](https://m.media-amazon.com/images/I/51oldiBEhaL._SL500_.jpg "Google App Engine for Java[実践]クラウドシステム構築 WEB+DB PRESS plus")

