前回は、Spring boot で Tymeleaf を使用して、簡単な Web アプリを作成しました。
今回は、これに加え DB から取ってきたデータを使用して Tymeleaf で表示してみたいと思います。
接続方法は、JdbcTemplate を使用します。Spring DATA JPA で接続する方法もありますが、JdbcTemplate のほうがシンプルです。簡単なアプリケーションであれば、JdbcTemplate でも十分です。
DB は PostgreSQL 9.5.3 、開発環境は STS 3.9.0 を使用しています。
インストールはこのあたりを参考に。
Spring Tool Suite ( STS )インストール - 山崎屋の技術メモ
WindowsにPostgreSQLをインストール - 山崎屋の技術メモ
DB の準備
name というカラムを1つだけ持つ fruits テーブルを作成しました。
postgres=# \d
           リレーションの一覧
 スキーマ |  名前  |    型    |  所有者
----------+--------+----------+----------
 public   | fruits | テーブル | postgres
(1 行)


postgres=# select * from fruits;
   name
-----------
 apple
 orange
 pineapple
(3 行)
プロジェクトの新規作成
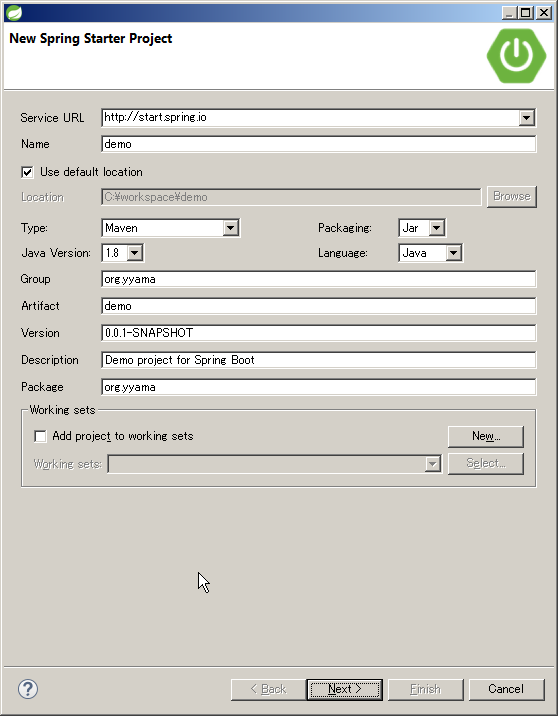
新規作成から「Spring Starter Project」を選択し、次のような感じで設定します。

依存関係には「Web」、「Tymeleaf」、「PostgreSQL」、「JDBC」を選択します。

こんな感じのプロジェクトが作成されました。

DBの接続情報を指定する
application.properties にはさまざまな設定を記述します。Spring boot が勝手に読み込んでくれます。
デフォルトでは、空ファイルになっていますが、次のような記述を追加します。
spring.datasource.driver-class-name=org.postgresql.Driver
spring.datasource.url=jdbc:postgresql://localhost:5432/postgres
spring.datasource.username=yyama
spring.datasource.password=password
これで、PostgreSQLに接続する準備が整いました。
Tymeleaf テンプレートの作成
resource 配下の templates 配下に次の index.html を配置します。
フルーツテーブルのすべてのレコードの name を表示します。
<!DOCTYPE html>
<html xmlns:th="http://www.thymeleaf.org">
<head>
    <meta charset="utf-8" />
    <title>demo</title>
</head>
<body>
<p th:each="fruit : ${fruits}" th:text="${fruit.get('name')}" />
</body>
</html>
コントローラの作成
最後にコントローラを作成します。
ackage org.yyama;

import java.util.List;
import java.util.Map;

import org.springframework.beans.factory.annotation.Autowired;
import org.springframework.jdbc.core.JdbcTemplate;
import org.springframework.stereotype.Controller;
import org.springframework.ui.Model;
import org.springframework.web.bind.annotation.RequestMapping;

@Controller
public class IndexController {

	@Autowired
	JdbcTemplate jdbcTemplate;

	@RequestMapping("/")
	public String index(Model model) {
		List<Map<String,Object>> list;
		list = jdbcTemplate.queryForList("select * from fruits");
		model.addAttribute("fruits", list);
		return "index";
	}
}
JdbcTemplate の変数を宣言し、@Autowired アノテーションを付けると、Spring が 自動でインジェクションしてくれます。
JdbcTemplate の queryForList を使用し、SQL を発行しています。 List<Map<String,Object>> 型の戻り値にテーブルの値がセットされています。
実行
実行したあと、localhost:8080 にアクセスすると、テーブルの値が表示されました。

デフォルトでコネクションプールも使用しているよ
JdbcTemplate はデフォルトの設定でもコネクションプールを使用しています。ブラウザからアクセスした後、PostgreSQL の 接続数を確認したら 10 個のコネクションがありました。
postgres=# SELECT * FROM pg_stat_activity;
 datid | datname  | pid  | usesysid | usename  |・・・
-------+----------+------+----------+----------+-・・・
 12373 | postgres | 5208 |    16421 | yyama    |・・・
 12373 | postgres | 3020 |       10 | postgres |・・・
 12373 | postgres | 5324 |       10 | postgres |・・・
 12373 | postgres | 3664 |       10 | postgres |・・・
 12373 | postgres | 4176 |       10 | postgres |・・・
 12373 | postgres | 1196 |       10 | postgres |・・・
 12373 | postgres | 5204 |       10 | postgres |・・・
 12373 | postgres | 1940 |       10 | postgres |・・・
 12373 | postgres | 3492 |       10 | postgres |・・・
 12373 | postgres | 5332 |       10 | postgres |・・・
 12373 | postgres | 6128 |       10 | postgres |・・・
(11 行)
ここらへんの設定をいじりたい場合は、application.properties に次のような記述を追加します。
spring.datasource.tomcat.maxActive=15
spring.datasource.tomcat.maxIdle=10
spring.datasource.tomcat.minIdle=5
spring.datasource.tomcat.initialSize=2
JdbcTemplate は生の JDBC を使いやすくしたくらいの機能かな?と思っていたのですが、結構高機能ですね。無理に JPA など使用しなくても大体の場面では、JdbcTemplate で十分だと思いました。
おしまい。
Spring 関連記事へのリンク集はこちら。
www.shookuro.com

はじめてのSpring Boot―スプリング・フレームワークで簡単Javaアプリ開発 (I・O BOOKS)
- 作者: 槙俊明
- 出版社/メーカー: 工学社
- 発売日: 2016/09/01
- メディア: 単行本
- この商品を含むブログ (1件) を見る

Spring徹底入門 Spring FrameworkによるJavaアプリケーション開発
- 作者: 株式会社NTTデータ
- 出版社/メーカー: 翔泳社
- 発売日: 2016/07/21
- メディア: 大型本
- この商品を含むブログ (1件) を見る